The Aquasun 3 CD is an Australian-made automatic solar controller that takes the guesswork out of pool heating while maximising energy efficiency and protecting your equipment.
Why Choose the Aquasun 3 CD?
The Aquasun 3 CD is more than just a basic solar controller. It’s a premium automatic system designed with intelligence and safety built in.
Key Features:
- Integrated Current Detection System: Ensures the solar pump only operates when your filtration pump is running and properly primed, preventing dry running and equipment damage
- Multiple Operating Modes: Summer heating, winter maintenance, tropical cooling, and manual override options
- Adjustable Temperature Control: Set your desired pool temperature with precision
- Optional Time-Clock Function: Control exactly when your pool heating operates
- Australian Made: Manufactured by Dontek Electronics in Victoria with quality components
- Safety First Design: Monitors power consumption to create a fail-safe system
This intelligent controller actively monitors conditions and adjusts operation to deliver consistent results while extending pump equipment life.
Complete Installation Guide
Step 1: Controller Placement
Choosing the right location for your control box is critical:
- Mount at least 3 meters from the pool’s edge
- Install in a sheltered location away from direct weather exposure
- The 1.8-meter power cable must plug directly into a standard outlet (do not use extension leads)
- Use the two built-in mounting tabs with appropriate screws
- Never drill through the controller housing
Step 2: Pump Configuration
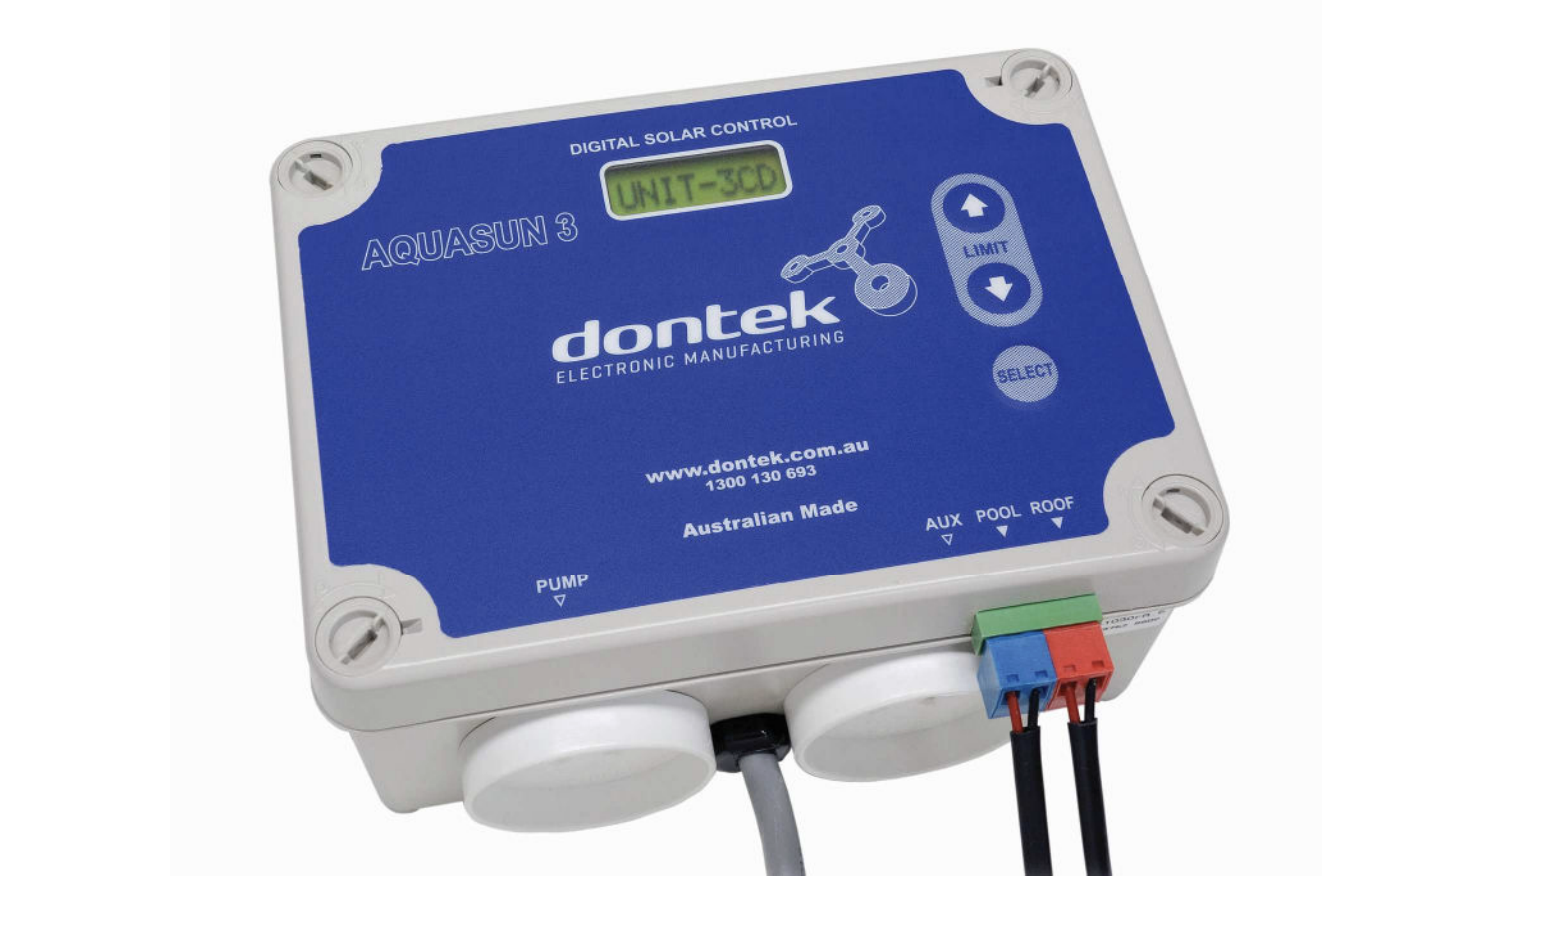
The Aquasun 3 CD features two separate 240V power sockets:
Left Socket (PUMP):
- Connect your solar pump here
- Only operates when the current detection confirms the filtration pump is running
Right Socket (AUXILIARY):
- Connect your ioniser/chlorinator or filtration pump timer
- Monitors power consumption to detect filtration pump operation
- Maximum rated load: 9.98 Amps / 2395 Watts
Step 3: Pool Temperature Sensor Installation
The pool sensor measures water temperature to determine when heating is needed.
Installation Location:
- Install in the filtration pump’s suction line
- Position as close to the pool as practical
- Keep away from direct sunlight for accurate readings
Installation Process:
- Drill a 14.5mm hole in the PVC pipe (use a Dontek PD01 grinding drill or standard drill bit rotating counter-clockwise)
- Insert the provided grommet into the hole
- Gently push the blue-grey sensor barb into the grommet
- Connect the blue sensor plug to the socket marked “POOL”
- Cable-tie approximately 30cm of sensor wire to the pipe
- Insulate this section to prevent ambient temperature from affecting the reading
Step 4: Roof Temperature Sensor Installation
The roof sensor monitors solar collector temperature to determine when heating potential exists.
Installation Location:
- Within arm’s reach of the gutter edge
- The sensor end must receive full sun exposure
- Install on a roof surface with a similar aspect to your main solar collector
- Never install on top of the solar collector itself
- Never install on high points like ridge capping (causes false readings)
Installation Process:
- Insert the sensor into a small piece of solar collector material or equivalent
- Attach securely to the appropriate roof location
- Connect the red sensor plug to the socket marked “ROOF”
- Critical: Keep the roof sensor cable as short as possible for lightning protection
Step 5: Temperature Sensor Cable Management
Proper cable installation is essential for long-term reliability and safety.
Critical Requirements:
- Never run sensor cables parallel to power cables
- Never cable-tie sensor cables to power cables
- Keep all cable runs under 50 meters when possible
- Use cable ties to fasten sensor cables to pipes (approximately 10mm from fittings)
- Tighten cable ties firmly but not excessively
Underground Installation:
- Use conduit to protect underground cable runs
- Seal conduit ends to prevent water ingress
- No cable joins permitted within the conduit
Cable Preparation:
- Remove any excess cable length and re-terminate with soldered, tinned wire ends
Step 6: Sensor Cable Polarity
- The sensor cable with the red trace is positive
- Connects to the right-hand side when looking at the plug screws
- Incorrect polarity displays as a short circuit or reversed fault
Operating Modes: Complete Breakdown
The Aquasun 3 CD offers four distinct operating modes plus a settings configuration. Press SELECT to cycle through available modes.
Summer Mode (Standard Pool Heating)
How It Works:
- The controller monitors both pool and roof temperatures continuously
- Solar pump starts when the roof temperature exceeds the pool temperature by 8°C (default)
- Pump operates until the pool reaches the set temperature plus 0.5°C
- Pump stops and waits until the pool drops 0.5°C below the target
- Cycle repeats automatically throughout the day
Manual Mode (Testing and Override)
How It Works:
- Immediately starts the pump if currently off, or stops if running
- Operates for 30 minutes, then returns to the previous mode
- Requires the filtration pump to be operating
- Perfect for testing installations on cold or cloudy days
Winter Mode (Off-Season Maintenance)
How It Works:
- Solar pump runs for 3 minutes once daily
- Operation begins 3 minutes after filtration pump starts
- Flushes treated pool water through the solar system
- Maintains pump bearings and mechanical seals
- Better than completely switching off the controller
Tropical Mode (Pool Cooling)
How It Works:
- Activates when the roof temperature is 4°C cooler than the pool water
- Typically operates at night (requires filtration to run overnight)
- Cools the pool to 1°C above your set temperature limit
- Resumes normal heating the next day if the pool drops 1°C below the target
- Ideal for pools that overheat from direct sun exposure
Initial Setup: Pump Load Configuration
Critical: The controller will not operate until the pump load is configured. The display shows “INSTALLER MUST SET PUMP LOAD” until completed.
Automatic Setup (Recommended):
- Ensure the filtration pump is operating and fully primed
- Hold the UP button, then press SELECT
- The controller automatically reads the load value and sets thresholds
- System returns to automatic operation
Manual Setup:
- Ensure the filtration pump is operating at the required speed
- Hold the DOWN button, then press SELECT
- Note displayed LOAD value
- Set RUN value to 10% lower than LOAD value
- Set TRIP value for overload protection (default 99)
- Press SELECT to save
This critical setting detects if your filtration pump fails to prime or stops, automatically protecting the solar pump from damage.
Temperature Control
Set your preferred pool temperature easily:
- Press UP to increase or DOWN to decrease target temperature
- Controller maintains temperature with 0.5°C precision
- Pump stops when pool exceeds target by 0.5°C
- Pump restarts when pool drops 0.5°C below target
Time-Clock Settings (Optional)
- Press SELECT until “SETTINGS” appears
- Choose “CLK? ON” to enable
- Set current time in 24-hour format
- Set START hour (6am-noon, default 9am)
- Set END hour (3pm-9pm, default 7pm)
Disabled: Solar pump runs anytime solar heating is available. Enabled: Solar pump restricted to set hours (except tropical mode)
Advanced Differential Settings
Warning: Adjusting these values from defaults may affect controller performance.
- Hold the UP button while applying power
- Set RUN° value (default 8°C)
- Set END° value (default 4°C)
- Press SELECT to accept
Coastal locations: RUN 6°C, END 4°C may provide better results
Troubleshooting Common Issues
“INSTALLER MUST SET PUMP LOAD”
- Controller requires initial pump load configuration
- Follow the automatic or manual setup procedure
“FILTER PUMP OFF, CANNOT START”
- The filtration pump is not operating or drawing water
- Filter blockage is preventing proper flow
- RUN value set too high
“OVERLOAD”
- Filtration pump drawing excessive current
- Variable speed pump operating too fast
- Check the filtration pump condition before operating the solar pump
Sensor Fault Messages:
- Display identifies which sensor failed (POOL and/or ROOF) and the failure type
- Check cable connections and polarity
System Reliability Features
- All settings are retained after a power loss
- Internal clock maintains time for up to 14 days
- 3-minute checking sequence when the filtration pump starts
- The automatic solar pump shuts down when the filtration pump stops
- Continuous load monitoring prevents equipment damage
Warranty Information
Coverage:
- 3-year limited warranty against component failure and faulty workmanship
- Return faulty units to the original dealer
Exclusions:
- Damage from misuse, power surges, or lightning strikes
- Installation not following the manufacturer’s instructions
- On-site labor or travel costs
Service Support: 1300 130 693 | Dontek Electronics, Victoria, Australia
Technical Specifications
- Power Requirements: 240V AC
- Maximum Socket Load: 9.98 Amps / 2395 Watts per socket
- Moisture Protection: IP23 rating (outdoor use under cover)
- Cable Length: 1.8 meters
- Sensor Cable Range: Under 50 meters recommended
- Temperature Accuracy: ±0.5°C
- Made in Australia (Victoria)
Final Recommendations
The Aquasun 3 CD provides professional-grade pool heating control with built-in safety features. Success depends on:
- Proper sensor placement following the guidelines precisely
- Correct initial pump load setup before first operation
- Quality cable installation with attention to routing
When installed correctly, this controller delivers years of reliable, efficient pool heating with minimal maintenance.